Introduction to Dutch Oven No Knead Bread
Why Homemade Bread is Worth It
There’s something truly magical about homemade bread. Imagine the aroma filling your kitchen, coupled with that satisfying crackle as you slice into a warm loaf. It’s a simple pleasure that store-bought options often can’t compete with. But why is making your own bread such a worthwhile endeavor for busy young professionals?
First, consider the health benefits. When you make bread at home, you control every ingredient, ensuring that your loaf is free from artificial preservatives and additives. You can even experiment with whole grains and seeds for added nutrients. According to the Whole Grains Council, incorporating whole grains into your diet can significantly lower the risk of heart disease and promote digestive health.
Then there’s the cost factor. Homemade bread can save you money in the long run. While the initial investment in quality ingredients may seem high, creating multiple loaves at a fraction of the cost of artisan bread from a bakery can really pay off. Plus, you’ll gain a new skill that can impress your friends at brunch!
So, what’s the catch? You might think traditional bread-making requires hours of kneading and waiting. Enter the Dutch Oven No Knead Bread technique—a game changer! This method takes the labor out of bread-making by allowing the dough to rise naturally over several hours, all without any strenuous kneading. The combination of moisture and heat in the oven creates that perfect crust while keeping the inside delightfully soft.
To get you started, here’s a hint: you’ll need just a few basic ingredients like flour, water, salt, and yeast. For a more detailed exploration of the process, you can check out this handy guide on bread-making basics.
With just a little patience and some guidance, anyone can become a bread-baking whiz. So why not roll up your sleeves and dive into this delightful culinary adventure? You won’t regret it!
Ingredients for Dutch Oven No Knead Bread
Making Dutch Oven No Knead Bread at home is not only rewarding but also a fantastic way to impress your friends or elevate your weekend brunch. The best part? It requires just a few simple ingredients that you probably already have in your pantry. Here’s what you need:
- All-purpose flour: 3 cups (plus a bit more for dusting)
- Water: 1.5 cups (room temperature)
- Salt: 1 teaspoon (any variety will do)
- Instant yeast: 1/4 teaspoon (or active dry yeast, if that’s what you have on hand)
Feel free to get creative! You can add a pinch of herbs or spices to enhance flavor, or even toss in some olive oil for richness.
Before you dive into mixing, remember that the magic of this recipe lies in the minimal handling of the dough, making it accessible for even novice bakers. If you’re curious about the science behind bread-making, check out resources from The Kitchn for some fascinating insights.
You’ll be amazed at how this simple blend of ingredients transforms into a crusty, artisanal loaf! What’s your favorite way to enjoy fresh bread?
Step-by-step Preparation of Dutch Oven No Knead Bread
Making your own bread at home can seem intimidating, especially if kneading is involved. But with Dutch Oven No Knead Bread, you’ll find that delicious, crusty bread is just a few simple steps away. Let’s unpack the process together – it’s easier than you might think!
Gather your ingredients
First things first, let’s collect our ingredients. Here’s what you’ll need for your Dutch Oven No Knead Bread:
- 3 cups all-purpose flour
- 1/4 teaspoon instant or active dry yeast
- 1 teaspoon salt
- 1 1/2 cups water (room temperature)
Feel free to add herbs, spices, or even cheese if you want to jazz things up. As the kitchn emphasizes, the beauty of no-knead bread is in its versatility!
Mix the water, yeast, and salt
Now that you have everything ready, grab a large mixing bowl. Combine the water, yeast, and salt, stirring gently until the salt dissolves. If you’re using dry yeast, make sure to let it sit a bit so that it activates. This step is crucial as it sets the foundation for your dough’s rise. Did you know that yeast has been used in bread-making for thousands of years? It’s pretty fascinating!
Incorporate the flour
Once your yeast mixture is bubbly and exciting, it’s time to invite flour to the party. Gradually add in the all-purpose flour, using a wooden spoon or spatula to mix until no dry flour remains. It will look shaggy, and that’s perfectly okay—this is what we want!
- Your dough will be sticky; resist the urge to add more flour.
- The moisture content is essential for that characteristic crust and chewy inside.
After everything is well mixed, cover the bowl with plastic wrap or a clean kitchen towel.
Let it rise
Now, here comes the hardest part: patience. Allow the dough to rise at room temperature for 12 to 18 hours. Yes, you heard me right! This long rise is what gives the bread its unique flavor and texture. As you wait, take a breather. Maybe binge-watch that series you’ve been meaning to catch up on or go for a long walk. It’s all about balance!
After the initial rise, your dough should have doubled in size and be a bit bubbly on the surface—this is a great sign that your Dutch Oven No Knead Bread is well on its way!
Prepare for baking
Once the dough has risen beautifully, take a moment to prepare for baking. Start by turning your oven to 450°F (232°C). While it heats, place your Dutch oven (with its lid on) in the oven to preheat. This little step will create the steam necessary for that perfect crust.
While waiting, flour your work surface lightly and gently scrape out your dough. Shape it into a ball, being mindful not to overwork it. If you want, you can provide some extra flavor by adding herbs at this stage.
Bake in the Dutch oven
After about 30 minutes of preheating, carefully remove your Dutch oven (it’s hot!). Place your dough ball inside, cover it with the lid, and let it bake for 30 minutes. Then, without removing the lid, reduce the oven temperature to 425°F (218°C) and bake for another 15 minutes.
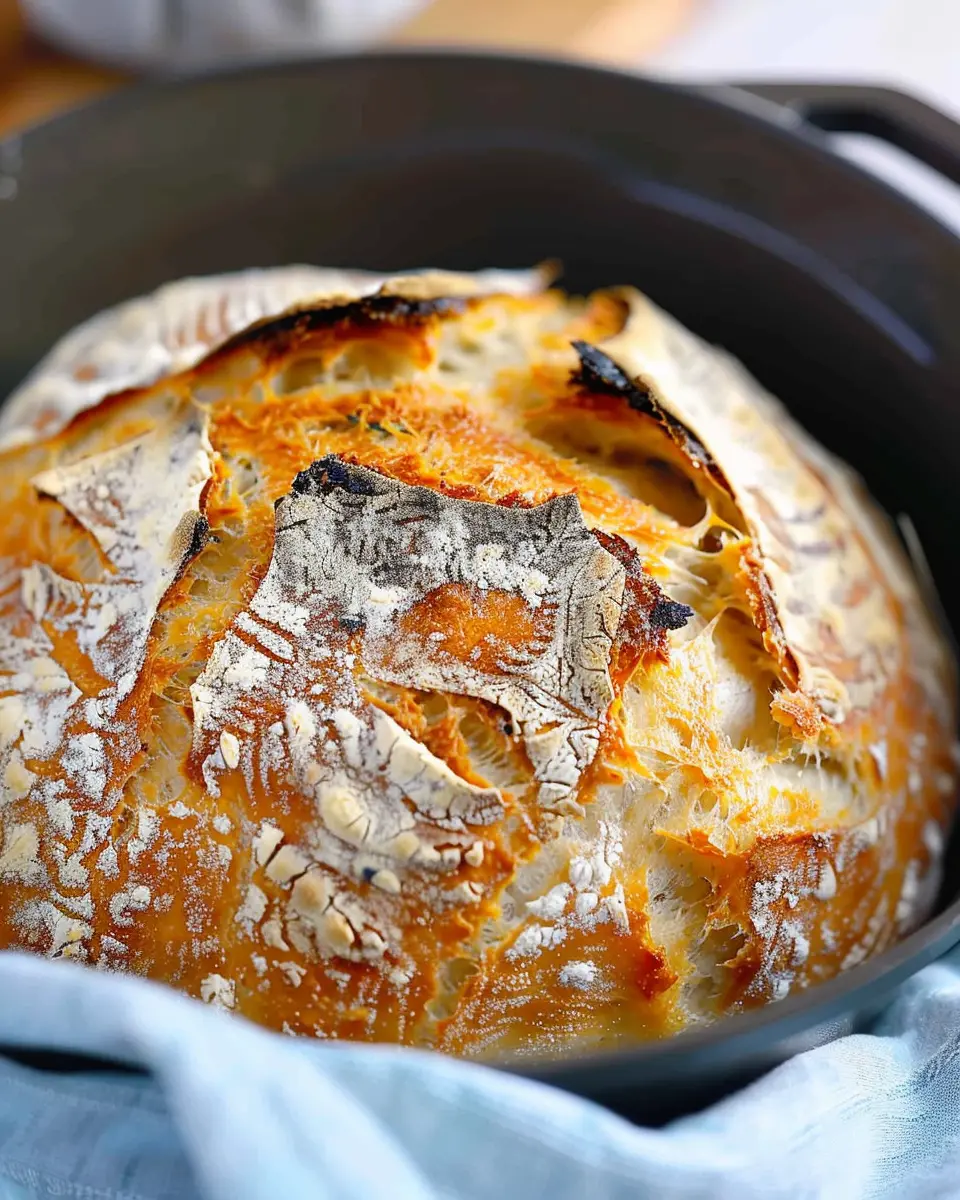
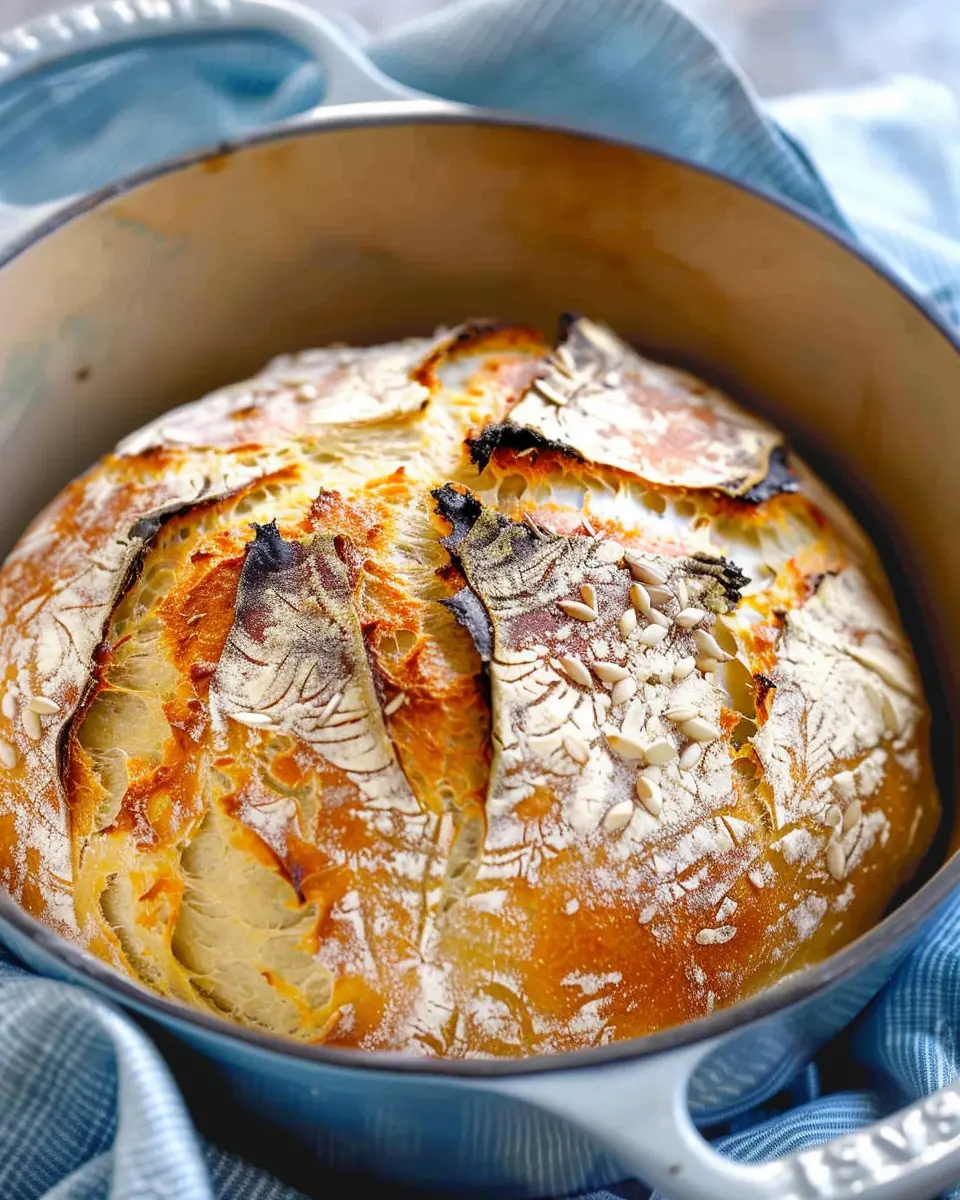
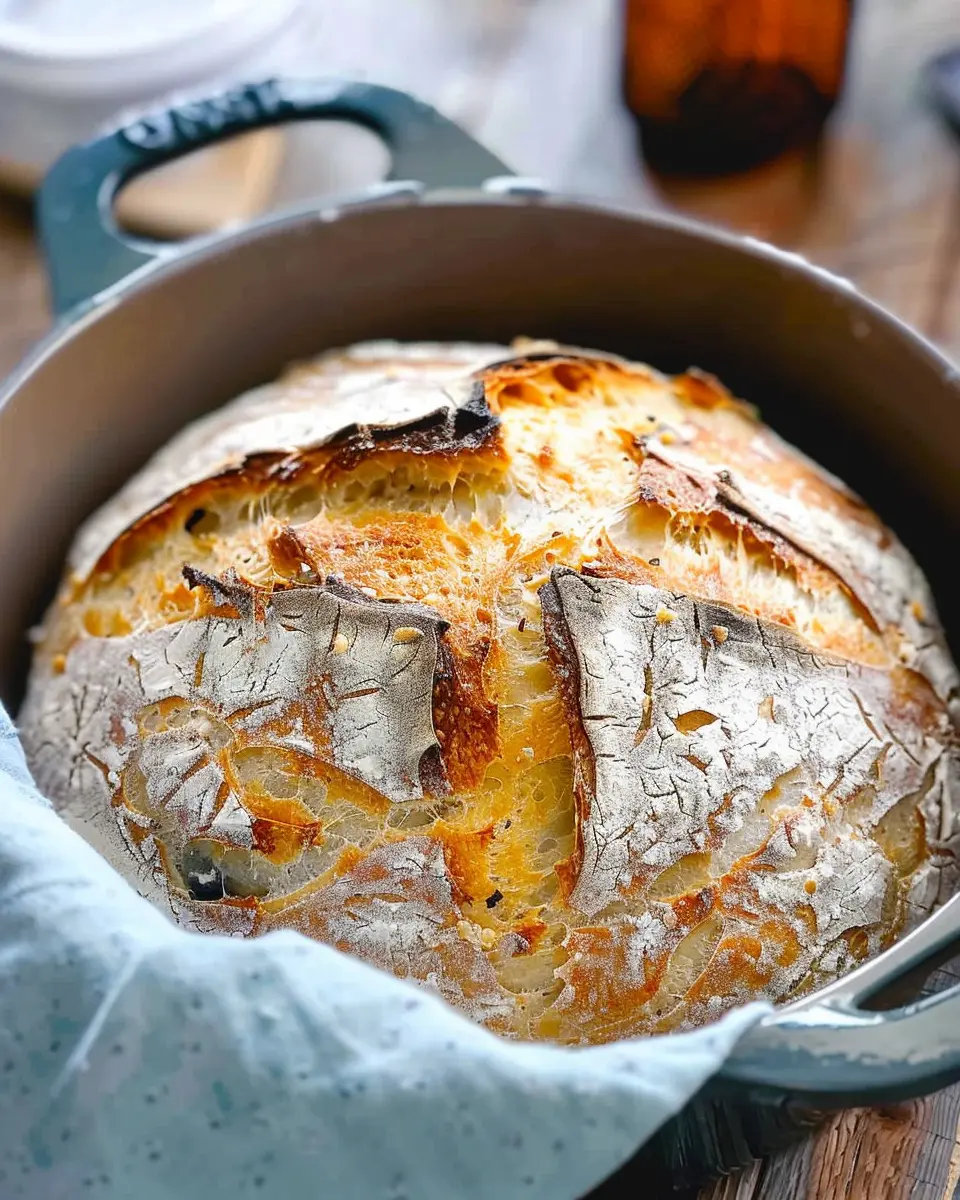
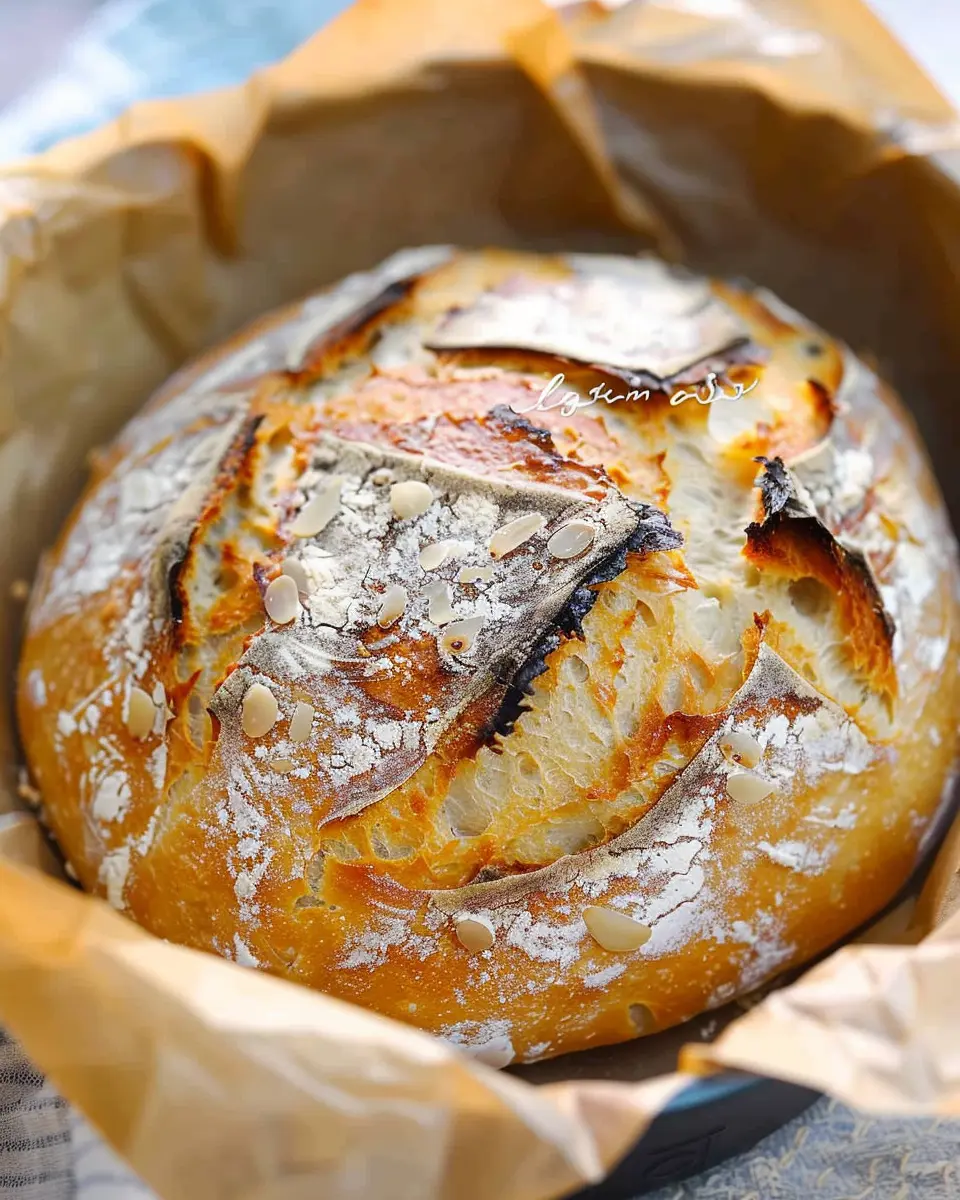
Once it’s golden brown and the smell has you practically drooling, your Dutch Oven No Knead Bread is ready! Remove it from the oven and let it cool on a wire rack before slicing it. Trust me—it’ll be worth the wait!
And there you have it! Fresh, homemade bread that’s surprisingly straightforward to make. Just think of all the creative sandwich possibilities waiting for you, from turkey bacon to chicken ham, all splayed between thick slices of this delectably crusty bread. Happy baking!
Variations on Dutch Oven No Knead Bread
Add Herbs and Spices
One of the simplest ways to elevate your Dutch Oven No Knead Bread is by infusing it with herbs and spices. Imagine biting into a warm loaf seasoned with rosemary, thyme, or oregano — pure bliss! Here are a few flavor combinations you can try:
- Garlic and Rosemary: Add minced garlic to the dough and sprinkle dried rosemary for a savory twist.
- Herbed Olive Oil: Drizzle the dough with olive oil mixed with Italian herbs before baking for an aromatic finish.
- Spicy Kick: Mix in red pepper flakes or ground cumin for those who crave a bit of heat in their bread.
These enhancements not only boost flavor but also make your kitchen smell heavenly!
Experiment with Cheese
Who doesn’t love a little cheesy goodness? Introducing cheese to your Dutch Oven No Knead Bread can result in a delightful, gooey center. Consider incorporating:
- Sharp Cheddar: Adds a bold flavor that perfectly complements the bread’s outer crust.
- Feta or Goat Cheese: Crumbled varieties can provide a creamy texture and a tangy kick.
- Parmesan: A sprinkle on top before baking can create a crispy, savory crust.
Wondering how to add cheese? Fold it into the dough right before the final rise or scatter it on top for a melt-in-your-mouth experience.
Final Thoughts
By adding herbs, spices, and cheese, you can make your Dutch Oven No Knead Bread uniquely yours. Feel free to get creative! The beauty of this recipe lies in its versatility—so don’t hesitate to experiment and discover new flavor profiles. For more inspiration, explore different bread recipes or join discussion forums on sites like King Arthur Baking or Food52 to connect with fellow bread enthusiasts!
Cooking Tips and Notes for Dutch Oven No Knead Bread
Making Dutch Oven No Knead Bread is a delightful adventure that can be mastered with just a few handy tips. Here’s how to elevate your baking game:
Embrace the Resting Time
The magic of no-knead bread lies in its long fermentation process. Let your dough rest for at least 12 hours—this not only enhances the flavor but also improves texture.
Use the Right Flour
Opt for bread flour if possible; it has a higher protein content, which helps create that perfect crusty exterior. However, all-purpose flour works too if that’s what you have on hand.
Preheat Your Dutch Oven
Always preheat your Dutch oven for about 30 minutes before baking. This mimics the environment of a professional oven and helps achieve a beautiful crust.
Don’t Skip the Steam
Adding a bit of water to the Dutch oven while baking creates steam, keeping the bread moist and chewy. This is a key step in getting that perfect artisanal bread vibe at home!
Experiment With Add-Ins
Feel free to customize your bread. Consider adding herbs, cheese, or even Turkey Bacon for an exciting flavor twist.
Curious to learn more about the science behind bread making? Check out King Arthur Baking for additional baking resources and tips. Happy baking!
Serving Suggestions for Dutch Oven No Knead Bread
When you bake a loaf of Dutch Oven No Knead Bread, the possibilities for serving it are endless. This rustic bread boasts a crispy crust and airy interior, making it a versatile canvas for many delightful pairings.
Perfect Pairings
- Hearty Soups and Stews: Serve slices alongside a rich vegetable soup or a robust beef stew. The bread’s texture is perfect for soaking up the flavorful broth.
- Charcuterie Board: Create a stunning board with Turkey Bacon, Chicken Ham, a variety of cheeses, and fresh fruits. The combination of flavors and textures will impress your guests.
- Breakfast Treats: Toast slices and top them with avocado and poached eggs for a delicious brunch option. Or, smear some peanut butter and banana for a quick, energizing breakfast.
Storing Leftovers
When you have leftover Dutch Oven No Knead Bread, store it in a paper bag at room temperature for up to three days. For longer storage, consider freezing slices for a quick meal later. Just pop a slice in the toaster for a warm treat anytime!
For more tips on pairing bread with your favorite meals, check out Food & Wine’s Guide to Bread Pairings.
Time Breakdown for Dutch Oven No Knead Bread
When you’re in the mood for freshly baked Dutch Oven No Knead Bread, knowing the time commitment can really help! Here’s a simple breakdown of what to expect:
Prep Time
Getting started is a breeze! You’ll need about 15 minutes to mix your ingredients. This is a wonderful opportunity to gather your favorite herbs or spices to customize your bread.
Rising Time
Now, the magic happens. Allow your dough to rise for 12 to 18 hours. While you wait, consider exploring hydration tips for bread-making here.
Baking Time
When it’s time to bake, set aside about 30 minutes. That’s all it takes for your kitchen to be filled with delicious aromas!
Total Time
In total, you’re looking at around 13-19 hours. While it seems lengthy, most of that time is hands-off, letting the dough do its thing so you can focus on other tasks.
If you’re ready to impress friends with your baking skills without the fuss, this Dutch Oven No Knead Bread is a fantastic choice!
Nutritional Facts for Dutch Oven No Knead Bread
When it comes to baking, understanding the nutritional profile of your creations is key—especially for your delightful Dutch Oven No Knead Bread. Let’s break down some essential nutritional facts to keep you informed, while you enjoy those crispy, golden slices.
Calories
A typical serving of Dutch Oven No Knead Bread contains about 100-120 calories. This makes it a fantastic addition to your meal without overwhelming your caloric intake.
Carbohydrates
In each slice, you’ll find around 20-25 grams of carbohydrates. These carbs provide the energy needed for those busy days at work or during last-minute fitness sessions.
Protein
Although it’s primarily a carbohydrate source, Dutch Oven No Knead Bread provides about 3-5 grams of protein per slice. Pair it with sources like Turkey Bacon or Chicken Ham for a well-rounded meal that keeps you satisfied.
For more detailed nutritional information, consider checking out resources like USDA FoodData Central or NutritionData, which offer in-depth analyses you might find helpful. Remember, if you have specific dietary needs, it’s always a good idea to adjust the ingredients or portions accordingly!
FAQs about Dutch Oven No Knead Bread
Why is my bread dense?
If you’ve found your Dutch Oven No Knead Bread to be denser than you anticipated, don’t fret! This can happen for a few reasons. One common culprit is inadequate rising time. Make sure you allow your dough to rest and rise properly; typically, a minimum of 12 hours for fermentation is ideal. Also, check the amount of flour you’re using—it’s critical to measure accurately. Flour can pack into measuring cups, leading to too much being used, which could result in density. Lastly, ensure your yeast is fresh! Old or expired yeast won’t work effectively.
Can I add ingredients to the dough?
Absolutely! One of the beauties of Dutch Oven No Knead Bread is its versatility. Feel free to mix in ingredients like:
- Nuts (walnuts or pecans)
- Seeds (sunflower or sesame)
- Dried fruits (like cranberries or raisins)
- Cheese (sharp cheddar or feta)
Just remember to keep the total additions balanced with the amount of flour, so your bread maintains its structure.
How do I store leftover bread?
Storing your Dutch Oven No Knead Bread correctly is essential to keep it fresh. Ideally, let it cool completely on a wire rack. Once cooled, wrap it in a clean kitchen towel to prevent it from becoming soggy. Store it in a bread box or a paper bag at room temperature for up to three days. If you want to keep it longer, slice it up and freeze the pieces in an airtight container. This way, you can enjoy a slice of homemade bread anytime!
For more tips on bread storage, check out resources like The Kitchn or Serious Eats.
Conclusion on Dutch Oven No Knead Bread
Making Dutch Oven No Knead Bread is not just about baking; it’s about creating a delicious experience in your kitchen. The simplicity of this recipe means even busy young professionals can find time to indulge in homemade bread without the fuss of traditional kneading. The crust becomes beautifully crispy while the inside remains soft and flavorful, making it perfect for everything from a casual evening with Turkey Bacon to a cozy brunch with Chicken Ham.
As you gain confidence with this method, feel free to experiment with different flours, add-ins, or spices to suit your taste! With minimal effort and a dash of patience, you can elevate any meal. So, grab your Dutch oven and start your baking journey! For more tips on baking, check out King Arthur Baking for trusted resources.
PrintDutch Oven No Knead Bread: The Easiest Homemade Delight

A simple method to bake delicious no knead bread in a Dutch oven, creating a crusty exterior and a soft, chewy inside.
- Prep Time: 15 minutes
- Cook Time: 45 minutes
- Total Time: 18 hours
- Yield: 1 loaf 1x
- Category: Bread
- Method: Baking
- Cuisine: American
- Diet: Vegetarian
Ingredients
- 3 cups all-purpose flour
- 1 ½ teaspoons salt
- ½ teaspoon instant yeast
- 1 ½ cups water, room temperature
Instructions
- In a large bowl, combine flour, salt, and instant yeast.
- Add water and stir until a shaggy dough forms.
- Cover the bowl with plastic wrap and let it rise at room temperature for 12-18 hours.
- Once the dough has risen, turn it out onto a floured surface and shape it into a ball.
- Let it rest for about 30 minutes while preheating the oven to 450°F (230°C).
- Place a Dutch oven (with the lid) into the oven to heat up for 30 minutes.
- Once heated, carefully remove the pot, place the dough inside, cover with the lid, and bake for 30 minutes.
- Remove the lid and bake for an additional 15 minutes until the crust is golden brown.
- Allow the bread to cool on a wire rack before slicing.
Notes
- For added flavor, herbs can be mixed into the dough before the rise.
- Always check the bread around the baking time to avoid over-baking.
Nutrition
- Serving Size: 1 slice
- Calories: 100
- Sugar: 0.5g
- Sodium: 200mg
- Fat: 1g
- Saturated Fat: 0g
- Unsaturated Fat: 1g
- Trans Fat: 0g
- Carbohydrates: 20g
- Fiber: 1g
- Protein: 3g
- Cholesterol: 0mg
Keywords: Dutch Oven No Knead Bread, bread, baking, no knead